Rifles & Spears
War Theatre – East Africa, c.1890
Germans In East Africa vs Masai
750pts
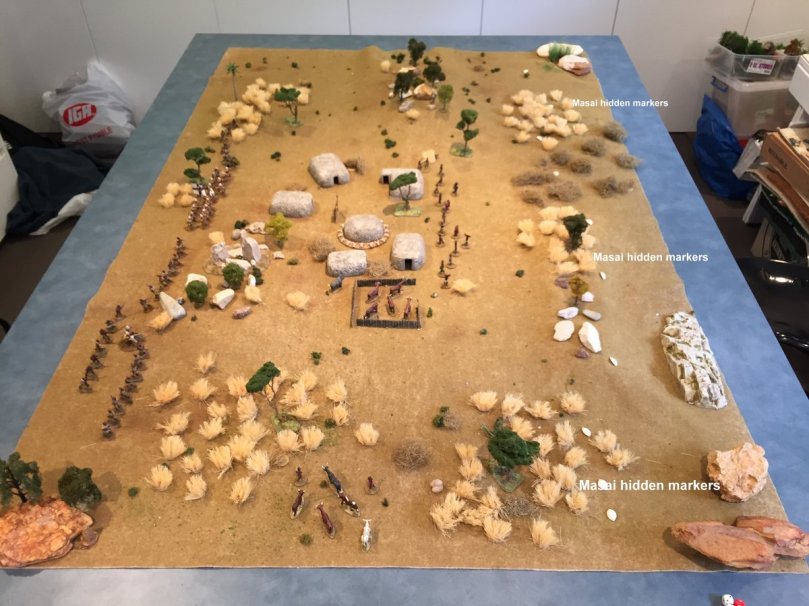
Setup
.
.
.
.
.
.
.
.
.
.
.
.
.
.
.
.
.
.
 .
.
.
.
.
Here you can see the Masai hidden markers – the white shields.
.
.
.
Run!!!
.
.
.
.
.
.
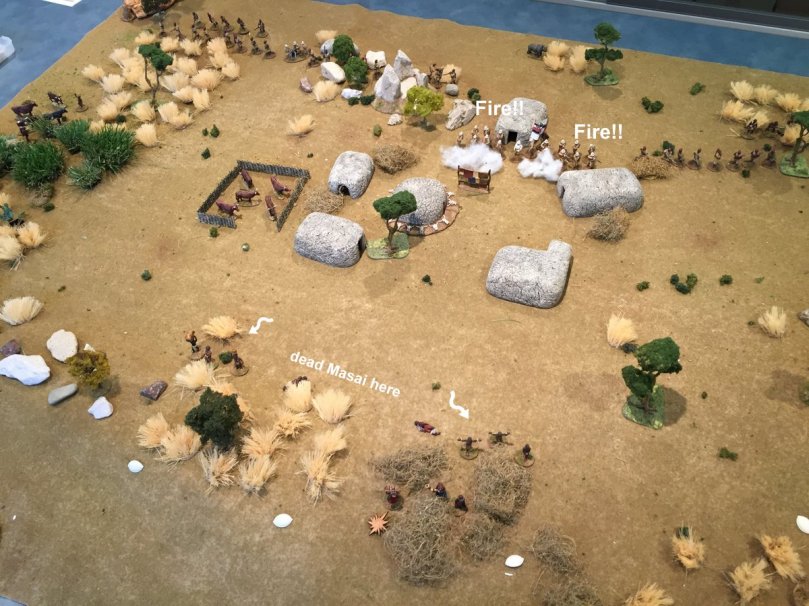
With teutonic efficiency the Marines pop-off with their Mauser repeating rifles and cut down the fleeing villagers, two groups out of six broke and ran from the shooting.
.
.
.
Realising that the Warriors need to draw off the German attacks on the villagers they use the covered approach of the hills, deploy off their hidden markers and descend like a wave crashing down from the hill…brave askaris!
.
.
.
Ruga-Ruga scouts and Askaris hold the line…
.
.
.
On the opposite (left) flank the Masai push up as well…two halves of their classic Eagle Wing formation, with central hidden markers deployed near the gully (lower left) not yet revealed. The civilians, still trying to flee the terror make for the gully and relative safety as the German prepare to meet the vengeful Masai.
.
.
.
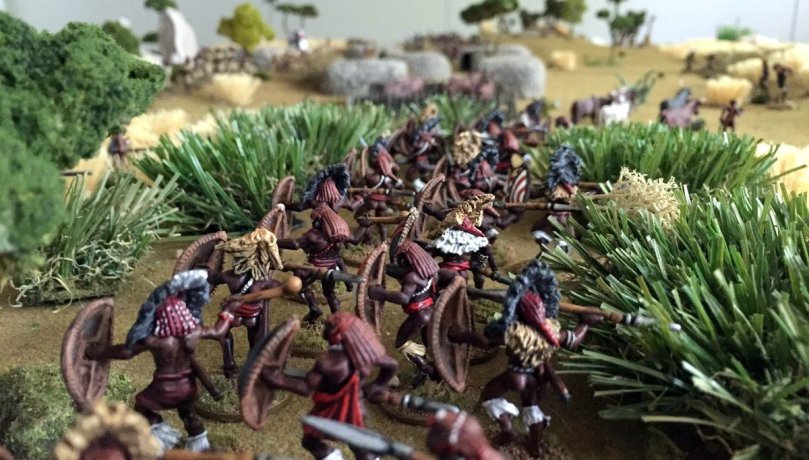
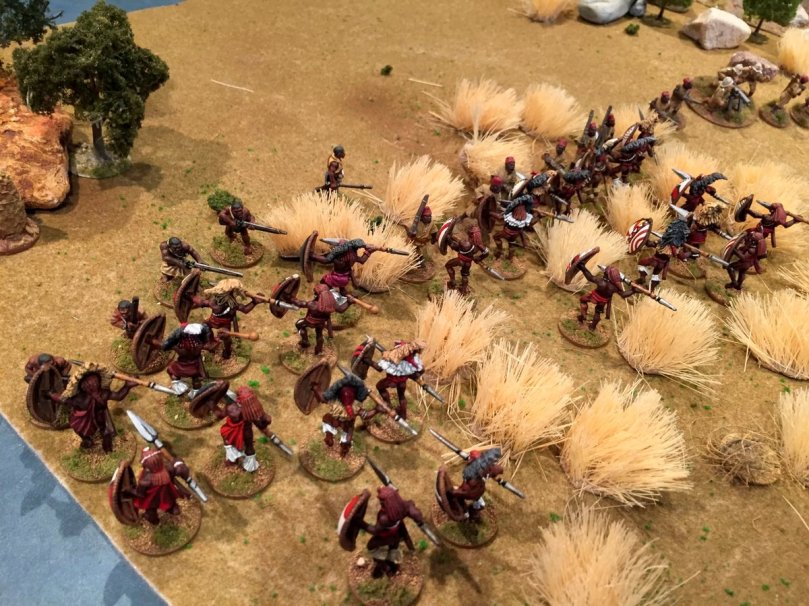
You will note that a patch of tall green grass has been added to the table. A random event called for the German player to place a piece of disruptive terrain…which he placed in front of the advancing Masai.
.
.
.
The Tall Grass is Very Difficult Going so this slowed the Masai to half speed.
.
.
.
….is that one Ruga-Ruga scout skiving off through the grass?
.
.
.
.
.
Ruga-Ruga may be tough but not as tough as that lot comin’ their way…and they know it!
.
.
.
.
.
.
…slowly the Masai push through the long grass…
.
.
.
On the opposite flank the elMoran push forward ever closer to the Wissmann askaris and supporting Ruga…
..
.
.
.
.
.
.
.
.
.
.
.
.
.
.
.
.
.
…make ready!!!
…fire!!!!
.
.
.
…in their terror they aim high …the elMoran press on through the sporadic and ineffective shooting of the askaris.
.
.
.
.
.
.
.
.
.
German officer looks pensively to his right seeing the rustle in the tall grass hoping his Ruga scouts don’t let him down…he needs to sum up this situation pretty quickly…left or right or both!
.
.
.
.
.
.
.
.
.
.
.
..the elMoran close and despite some valiant fighting by the askaris there are simply to many of the fearsome warriors as they break into the ragged askari firing line thrusting their spears…
.
.
.
…seeing the developing threat the Marines shake out and prepare to fire…
.
.
.
to the right of the main Masai attack another detachment sweep through the scattered grass to flank the position to press the assault…
.
.
.
It’s a slaughter. The askaris could not hold the tidal wave of elMoran and they are eliminated completely!
.
.
.
…pushing on the Marines prepare to receive…
..
.
.
.
.
.
.
.
.
.
.
.
On the opposite flank the Ruga-Ruga now get a clear look at the Masai coming their way as they emerge from the tall grass that had slowed their progress. Realising they can do little to stop them they take the opportunity to fall back alongside the supporting askaris to their left…
.
.
.
.
.
.
.
.
Meanwhile back near the village the elMoran manoeuvre to come face to face with the ‘hated’ Germans…
(player note – in the early stages of this (second) turn the German player’s cards nearly all came out before any Masai cards. This resulted in the Masai getting alot of movement whilst the German player had largely had his go…so the Masai forces were moving quickly. The right flank forces were also Elite giving them an extra move further speeding up their progress – so the sequencing of card play had an important effect on how the scenario was playing out).
.
.
.
.
..pushing forward the elMoran slam into the the Ruga-Ruga and Askaris…there’s nothing subtle about the Masai tactics..close as quickly as you can with simi (sword) and spear…and get stuck in!
.
.
.
.
…showing no fear the Masai go straight at the Marines, who have their backs to the wall!!…
.
.
.
the Marines, deployed in firing line, quite simply drop their bundle…the best chance to stop the enemy was now and they fail to measure up (rolling horrible dice)…though they did pass their ‘terror check’…
.
.
.
…despite causing some casualties they unfortunately could not account for the Masai rolling a 6 on their reaction test…they close in for the kill!!
.
[It’s worth pausing here and pointing out a few aspects of the rules for a moment. Uniquely in R&S, the Masai have two options for attacking, either of which has to be chosen for all of a player’s warriors before the game starts. He may represent the northern tribe warrior style of fighting which involved hurling weapons at an enemy and then ferociously charging into contact in an effort to sweep away their opposition. The other option is that they throw some of their weapons but principally go into melee and fight hand to hand. Either way, the defending force has to test its morale because the Masai invoke terror in their enemy so they may buckle before contact is made.
For this game the Masai player has elected to use the later style of combat. In the situation above when the Masai charge the defender must take a reaction test due to ‘terror’ as already mentioned. In this case the Marines passed particularly with their officer nearby (<6″), needing a 2+ to be successful. The Masai then close and hand to hand ensues. In contact are 5 Masai vs 4 Marines.
The Marines are armed with repeaters which means that they strike first in combat i.e. it is not simultaneous. They also re roll any misses for the ‘magazine fire’ trait that the repeating rifle has. In this case the marines gain a +1drm for being in a firing line and being armed with repeaters in the initial round of melee. Despite these benefits in this case they only inflict 2 casualties on the Masai which triggers a reaction test…a fairly poor showing on the firing dice.
The Masai rolled a 6 passing their reaction test and they now fight with the remaining three figures they still have in contact after removing the two casualties from the Marines initial strike in melee. The Masai strike with their three warriors and score two hits which are saved by the Marines. So the Masai have suffered the most casualties, but as they have already passed their reaction test in phase 2, the combat now continues and a general all in brawl ensues…]
.
.
.
Meanwhile, on the opposite flank the German Asakris were under assault as well. The elMoran have pushed through the grass and attacked both the Ruga-Ruga scouts and the Wissmann askaris to their front. The German maxim machine gun team, unfortunately, forgot to be placed on vigilance and thus failed to target the Masai as they moved across their front…they must have been distracted…and boy was that a mistake!
.
.
.
A sharp and bloody fight ensued and the Masai, true to form, cut their way through the askaris, despite receiving breechloader fire (i.e. striking first)…askaris really aren’t keen on close combat fighting…particularly against this lot…
.
.
.
.
Back in the village the fight between the elMoran and the Marines continues. Now the elMoran can move up in the follow on combat by quickly getting around their opponent who no longer gains a benefit from their repeaters in close combat. The fighting is simultaneous…and desperate it is, mostly by the Germans. Losses mount up but their morale still holds.
.
.
.
Half the Marines have been cut down along with some more warriors…backs to the wall stuff!
.
.
.
…pressing the assault the elMoran pile in to try and finish them off. Weight of numbers now tells and the Germans are doomed…they are cut down to a man and the unit disintegrates.
.
.
.
Overview of the action.
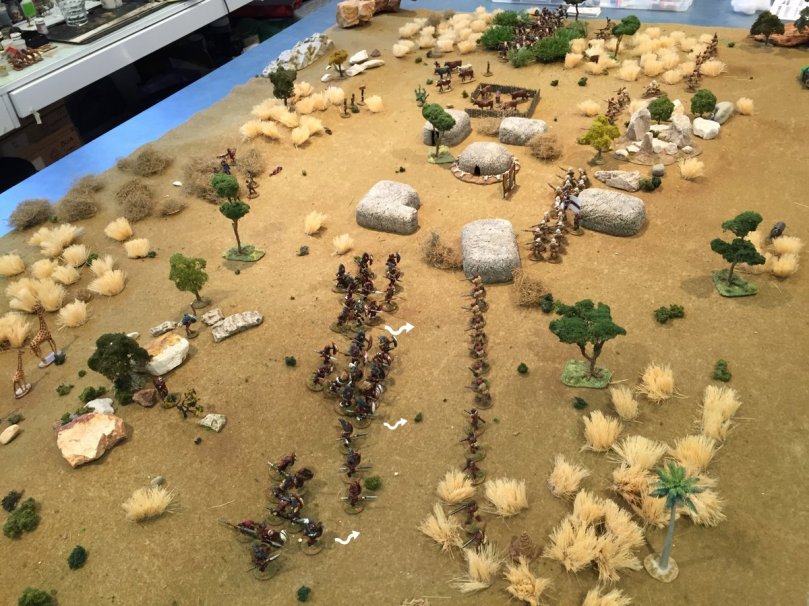
The elMoran (near ground) have finished of the Marines that they had fought for three consecutive combat rounds. Another unit faces of the German left flank Ruga-Ruga scouts and some Masai youth archers make an appearance to the rear. On the other flank the warriors have cut a swathe through the askaris and driven back the Ruga scouts, thus both wings of the Germans have been driven in, or away, and things are looking grim for Wissmantruppe!
.
.
.
The German commander fights one on one with a Masai warrior – neither side inflicts casualties as the two men parry and thrust…
.
.
.
…this enables the combat to go to a second round and the remaining Masai move up in support sealing the fate of the German…
…that red, black and white flag will fit in nicely with the Masai village decor they think!…
.
.
.
Ruga scouts get reminded why they don’t venture into Masailand!
.
.
.
With the German right flank crumbling the Masai swoop on the Maxim crew from the flank…
.
.
.
…even though the rhino holds the line, moments before the German left flank Ruga were defending this patch of ground….no longer!
.
.
.
…like running water the Masai flow into their village to deliver the coup de grace to the invader…
.
.
.
…the maxim crew puts up little resistance…their position totally overrun.
.
.
.
..continuing to press the attack the Masai now drive into the remaining askari unit from the flank…ouch!
.
.
.
.
.
.
When attacked from the flank the combat is simultaneous as the defenders cannot put up a ‘final fire’ to hold of the attackers so this really puts the askaris at a disadvantage…needless to say…
.
.
.
.
.
.
..the askaris are simply not up to it and they are assailed from front, flank and rear…they are swept away…
Note – if it seems like the Masai have been doing ALL the moving in this later stage of the action then you are right. In this turn (three), nearly all the German cards came out before any of the Masai cards… most unusual….and we did shuffle the deck properly! When the German cards came out they had few targets to shoot at and when they did their fire was ineffective (poor dice rolling). At the back end of the card deck the Masai had a solid run of 1-action cards…all 4 of which the above Masai movements show…that enabled them to move with great speed and keep the tempo of the attack going as you can see…that’s just how the cards fell…fog of war!
.
.
.
…the victorious Masai now turn their attention to the lone Marine unit on table…
.
.
.
…vengeful Masai move in to deliver the final blow…
.
.
.
.
…at this point the German leader of the lone Marine unit reached down and picked up a twig and waved it at the Masai leader before him…offering surrender and hoping to save his neck…
.
.
.
…finally, when faced with enemy they simply could not fight!
So ended the game..a decisive Masai victory…with utter defeat for the Wissmantruppe!
(maybe this sets the scene for the next game – rescue the captured marines??)
.
.
.
.
.
.
Debrief
The German player had some truly horrible luck in this encounter. He opened up well and eliminated half of the civilian casualties with some accurate rifle fire but otherwise failed to get the others civilians who scampered into the gully thus denying him his mission objective. The Masai player easily met his objective by eliminating two-thirds of the enemy force.
The hapless German commander rolled some terrible dice at critical moments and probably spread himself out to thinly and failed to place units on vigilance to maximise his force’s firepower after enemy movement – a hard lesson learned for next time that cost him much shooting in the way the cards fell for him despite having the advantage of holding three cards in his hand, to the Masai player’s single card at any one time.
The Masai couldn’t have played it any better or had better luck. The elMoran moved up very quickly and got into hand to hand to prevent as little fire coming their way as possible. The fall of the cards helped them in this regard but their speed proved to be a weapon in itself.
However, despite all the fancy dancing they could easily have buckled on a couple of reaction tests and were within a casualty here and there of triggering the nasty -2drm for heavy losses from fire that generally result in a recoil or flee result which would have put them smack in front of enemy repeater armed troops who would have hurt them badly given another round of fire. Whilst things seemed lopsided, they were closer than might appear by the flow of events and a couple of (easily) failed reaction tests or another turn would have changed things rather quickly.
It is also worth pointing out that the Masai are the best warriors in this period (along with a few others) so they produce a stark contrast in the games they are involved in…they either die from ranged fire or will generally defeat their opponent if they get into hand to hand with enough warriors…the firepower attrition vs Masai close and combat equation is what is at play here. Other armies with less ‘dramatic qualities’ will have a more even and more graduated difference in fighting styles and outcomes particularly if they are a mix of close combat and ranged fire troop types, rather than a pure close combat force like the Masai.
However, in light of a few things we have added a couple of small (-1drm) modifiers in the fighting and morale sequence to increase the effectiveness of firepower a bit as it seemed just a little under done. This should enable the defenders with breechloaders and repeaters slightly more ability to dish out firepower to keep their enemy from closing into melee. It’s only a tweak however and probably still wouldn’t have changed alot for this action as the way the game played out had alot to do with the final result.
The key for the German player was to be able to keep the Masai away from him because once they enter hand to hand things deteriorate rapidly against these natural born killers…they failed to do this and paid the price.
All in all a cracking good game that played in 2.5hrs, 30 minute set up…pretty good for a 750pt game involving over 100 figures…excellent stuff…











Great looking game ,beautiful in all aspects,there will be many a sad fraulein in the harbor at Cuxhaven this evening.
LikeLike
Thanks…it did look good. The Masai juxtaposed against the dry grass really looks effective.
“many a sad fraulein in the harbor at Cuxhaven this evening”
…the bad news has reached Mombasa. A relief party is being put together as we speak 😉
LikeLike
As usual a great looking game – your Masai forces look scary and impressive as they charge forward. I really like the sound of the rules, but for this game – when reading it – it seemed a bit one dimensional, let me try and explain.
First of I realise that with Engagement and Slaughter the tone of the game is pretty much set from the start.But for the Masai it was just a question of staying hidden for as long as possible and then charging, while for the German forces there again was just limited options, kill the civilians and then try and see whether they could cut down the Masai before they got to them. I realise that there are of course other options that could have been taken, but were not. This is the only fear I have with what I otherwise think will be a cracking rules system. Side plots will of course be integral to making the combatants think of other things as well.
LikeLike
Hey Kaspar,
I totally understand where you are coming from regards the one-dimensional-ness of the Masai tribal force….and I agree with you! When I decided to build a Masai force I had in mind the idea of a pure tribal force and one that could be used as allies in a larger force. The Masai I put together fulfilled that role.
Simply put, I really like them as a totally different looking, beautifully sculpted line of figures that are rarely seen ‘en masse’ so I went for them. I like the themed setting they fought in and their opponents. Taken as a whole they offered ME something different to what I have and what is normally seen …other people’s tastes vary and there are options for everyone.
In the Darkest Africa genre there are so many other armies (tribal and otherwise) made up of all sorts of troop types in Rifles & Spears that add a significant amount of variety to a tribal force and the way it plays. Combined with the stratagems and command and control abilities of any specific force, a player has much to choose from when it comes to multi faceted tribal armies.
You can go fairly simple (like the Masai) or have more moving parts in a force (like the Azande). My Masai will likely form the basis of a Chaga army which incorporates musket and breechloader armed warriors as well as fearsome spear and club armed warriors portrayed in this post…that will be an interesting force and change things up…other uses of the Masai also exist.
So what you see here at present is ‘pure’ colonial…spears vs bullets (aka colonial Zulus vs Brits or indeed FIW British vs an Indian War party) but this only opens the gate on so many other ways to use other tribal forces and is only the start of the Masai being used in a few other settings as allies and enemies and in different combinations in other lists. I’m not going to be overly fussy about using the Masai in a few other armies though some minor details might be different.
When one combines all the potential variations with the varied scenario system, of which I have a few new ones as well, combined with random events and side plots, there is all the variety one could want. IN fact there dis more variation in this period than there is in the Muskets & Tomahawks period because you have the mix of musket, breechloader and repeater rifles mixed in with several types of artillery and machine guns plus tribal warriors that fighting in many different ways…lots more going on. The Masai, agreed, are a ‘pure’ one dimensional force. For me the history, theatre and backdrop more than make up for a total lack of a multi troop force and off course their enemies are usually varied in composition and type as well.
I hope to show a few other forces engaged in this period and the game should take on a slightly different tone in the same way that a FIW Muskets & Tomahawks game does with the troop types and force mixes possible in that theatre.
Cheers
HW
LikeLike
I am very impressed. One question: where can I get a copy of the rules ?
With kind regards,
Franz
LikeLike
Hi Franz,
Thanks for your kind words.
The rules at present unfortunately are not a stand alone add on to Muskets & Tomahawks but a fully integrated set which essentially transforms the original game. However it very much still is the original game….hence I am not really in a position to pass them around freely else Studio Tomahawks copyright may be breached.
I guess what I’m going to need to do is see if Studio Tomahawks have any objection to them being used by others. I do find however that if I were to ask it’s not the same as a third party doing so…I’m posting my use of the game but not trying in any way to ‘sell’ it as such. Maybe you could contact Alex Buchel and see what he says?
I think the game has potential…and a wider circle of people using them would help develop them but I’m not quite in a position to put them in circulation if you follow.
Hope that helps.
Happy W
LikeLike
Hi Happy Wanderer,
and thank you for your advice. I will try to ask Alex as you suggested. As I have the original M&T Rules , I was already able to understand most of your stats, the rest is more or less from Chris Peers… Only the rules for Artillery and MGs, compared the rules in M&T are still not clear to me. Maybe you will find some time to explain this detail ?
Kind regards, Franz
thank you very much
LikeLike
Hi Franz,
“I will try to ask Alex as you suggested”…hope you do 😉
The Artillery and MG rules are pretty straight forward. The only real differences are that for Artillery that is of a modern type ie Napoleonic or later, the weapon activates on the unit Type card…not the artillery card. The Artillery card is reserved for 18th century or antiquated guns and heavy siege weapons ie anything heavier than a 12pdr.
WhatI’ll do is pop up a quick post with some page shots that will reveal all regards Artillery, MGs and Unit Traits…I;m sure that will help.
Cheers
HW
LikeLike